Create, Learn, Do with Officeworks and Stylist Emma Clapham
Create, Learn, Do with Officeworks and Stylist Emma Clapham
Officeworks has your Eastertainment covered
Just in time for the Easter break, Officeworks and stylist Emma Clapham from Who Loves That, have teamed up to provide a series of simple but inspiring projects to create unique and beautiful crafts for the home, and keep the little ones entertained.
'Easter is a fantastic time to get together with the family and get creative. Officeworks has the widest range of products at the lowest prices so making your big idea a reality is as simple as a few cuts, pastes and colours", said Emma Clapham.
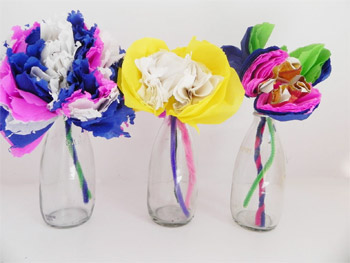
How To Create Your Own Paper Flowers
Homemade paper flowers are a gorgeous way to brighten up your home – with the added benefit of requiring no maintenance! The boundless variety of colours and shapes are limited only by one's imagination.
Products
Elephant Learning Company decorative paper scissors RRP: $10.01
Elephant Learning Company assorted chenille sticks RRP: $1.98
Elephant Learning Company crepe paper (colours of your choice) RRP: $2.33
Step 1: Cut your crepe paper into multiple pieces measuring 10cm x 15 cm, and stack 8-15 pieces of crepe paper together (this will determine the thickness of the flowers). If you wish, you can alternate colours for a multi-coloured flower.
Step 2: On the longest side of your piece, fold the paper in 1cm increments back and forth, similar to how you would fold a fan. Ensure all of the paper is folded.
Step 3: Fold your chenille sticks around the centre of the tissue paper to keep the folds secure. This will also create your stem.
Step 4: Using your scissors cut each end of the crepe paper to your desired petal shape; we have created a range of shapes using the different paper scissors. Feel free to have play and experiment with different cutting techniques, e.g. frayed look, petal look etc.
Step 5: Unfold each side into a fan shape (as far as the crepe paper will allow), and then carefully pull apart each piece of paper to create the shape of your flower.
You're finished!
 How To Create A Corner Storage Shelf
Spruce up your work space with corner storage shelves – an innovative and stylish option for those on a budget that can easily be dressed up with vases, photo frames or books.
Products
Scotch Heavy Duty clear mounting tape RRP: $10.38
Esselte Mesh Magazine file RRP: $10.88
Studymate wooden ruler RRP: $1.47
Columbia Copperplate lead pencil RRP: $0.46
Deskworks adult scissors RRP: $2.88
Step 1: Using your measuring tape and pencil, mark the areas on the corner of your walls where you would like to place your shelves. Then, cut your permanent mounting tape and turn your file assist on its side, placing the tape on the back and side.
Step 2: Pick up your file assist and position onto the marked areas on your wall, press firmly on the wall and hold for 30 seconds. Decorate as you wish!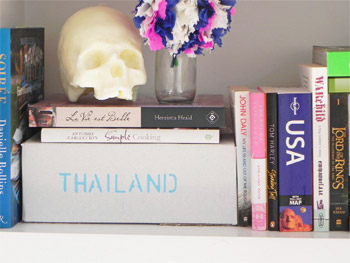 How To Create A Holiday Scrapbox
For the avid globe trotter, try creating a travel scrap-box for a fun way to store all your favourite mementos including including including including including travel travel travel travel journals, key rings and journals, key rings and journals, key rings and journals, key rings andjournals, key rings and journals, key rings and journals, key rings and journals, key rings andjournals, key rings and currencycurrency currency, before heading off on the next adventure.
Products
A4 shipping box (310mm x 225mm x 110mm) RRP: $2.78
Deskworks adult scissors RRP: $2.88
Bostik clag past RRP: $3.48
J.Burrows clear sticky tape RRP: $1.46
Any of your travel photos/memorabilla
Any stickers/magazine cut-outs which suit your theme.
Step 1: Choose the side of the shipping box that will be the front/face of your scrapbook box. Grab your letter stencil and a coloured pen, and stencil in the name or theme of your choice.
Step 2: Construct your shipping box, and using your sticky tape, tape the bottom of the box together to create your base.
Step 3: Turn your box over so that the base is flat on the table. Grab your glue, and stick your photos, magazine clippings, stickers etc. to the inside base and sides of the box .
Step 4: Once the glue has dried, fill the scrapbook with any loose memorabilia items you wish to keep in the box, such as travel journals, key rings or currency.
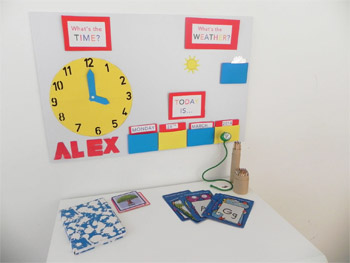 How To Create A Children's Homework Station
To ensure the kids are occupied for the holidays and on track for the rest of the school year, help them to create their own homework station with daily activities such as -what's the weather?', -what's the time?' and -today is…'
Products
Scotch Heavy Duty clear mounting tape RRP: $10.38
Celco letter stencil RRP: $7.98
Deskworks adult scissors RRP: $2.88
Quill PVC foam board RRP: $16.98
Velcro stick on mini dots in white RRP: $5.41
Esselte drawing pins RRP: $4.27
Sharpie fine permanent marker RRP: $1.93
Quill coloured envelopes RRP: $5.97
Quill coloured card RRP: $7.78
Step 1: On your computer, type the themes of the activities you wish to have on the homework board. We used: -what's the time?', -what's the weather?' and -today is…' Use a fun font and add some colour to the words by highlighting letters in different shades.
Step 2: Select pictures and shapes for the -what's the weather?' section. Think sunny, rainy, storming, hot, snow, nighttime etc. so you've got all areas covered.
Step 3: Print the letters, and carefully cut them out. Grab your thick paper, and cut frames large enough to house your letters in, and glue the words onto the cardboard frames.
Step 4: Cut three envelopes in half and seal them, leaving you with six mini envelopes. These will hold the days of the week, date, month, year and images of the weather.
Step 5: Have a play on your board with the positioning of your activities. Once you're happy, use your velcro dots to stick the envelopes and words on the board.
Step 6: On a separate piece of cardboard, trace the outline of your dinner plate to form the shape of your clock. Once your circle is complete, use your scissors and cut around the outside.
Step 7: Use your number stencil and a thin black Texta to draw the numbers 1-12 around the face of your clock.
Step 8: Using a different coloured piece of cardboard, cut the two hands of your clock (one larger than the other), then pin onto the centre of the clock with your drawing pins.
Step 9: Place your days of the week, months, and weather images etc. in their envelopes, and place the homework station on top of your desk!
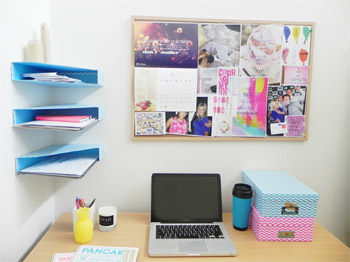
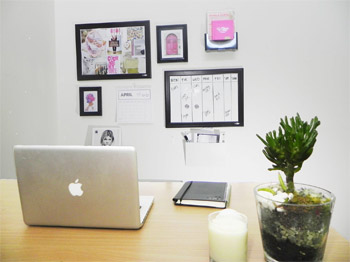 How To Create An Organised Wall
Keep ahead of the game and stay motivated with a beautiful organisation wall. By combining personal inspiration with a weekly planner, achieving your goals and meeting deadlines has never been easier.
Products
UR1 Baroque photo frame RRP: $7 each
Esselte Mesh Magazine file RRP: $10.88
Command poster mounting strips RRP: $6.81
Command picture hanging strips 4 set RRP: $9.96
Quartet corkboard RRP: $23.33
Quartet Euro whiteboard RRP: $9.98
Studymate wooden ruler RRP: $1.47
Columbia Copperplate lead pencil RRP: $0.46
Calendar of your choosing
Step 1: With your measuring tape, measure a square on your chosen wall that you'd like to place all of the items within. Next, measure the dimensions of the items you will be placing on the wall. You're free to choose anything you like, but we recommend leaving 4cm between each item. Then, in pencil, carefully mark the areas on the wall where you would like them to sit.
Step 2: Start by placing your biggest items on the wall first. Turning your pin board and white board over, place hanging strips onto each corner. Line up with the marked areas on your wall, and pressing firmly, hold down for 30 seconds.
Step 3: Place your images or quotes into the photo frames, attach the hanging strips, and place firmly on the wall.
Step 4: Place your adhesive hook on the wall, and hang your calendar.
Step 5: Take a step back and check how the wall is looking, and then secure your remaining items on the wall with hanging strips.
To unlock your creative potential, visit your local Officeworks or shop online at officeworks.com.au.


MORE